Loqari ist ein selbst gehosteter Telegram-Assistent mit KI-Anbindung. Er liest deine Termine und E-Mails aus verbundenen Konten (Google, Microsoft 365, CalDAV, IMAP, ICS-Abos) und schickt sie als kompaktes Briefing per Telegram.
Self-hosted Docker-Container, der Kalender + Mails mit einem Telegram-Bot und KI verbindet.
Diese Anleitung beschreibt die Installation und Erstkonfiguration auf allen gängigen Plattformen: Linux, macOS, Windows (Docker Desktop / WSL2), Synology DSM, UGREEN NAS, QNAP, Unraid, TrueNAS Scale sowie Kubernetes.
---
---
| Komponente | Mindestversion | Hinweis | | ---------- | -------------- | ------- | | Docker Engine | 24.x | mit Compose-Plugin (docker compose, nicht docker-compose) | | RAM | 256 MB frei | App-Container selbst ist sehr leicht | | Disk | ~300 MB | Image + Daten | | CPU | beliebig (x86_64 oder ARM64) | | | Netzwerk | ausgehend zu Telegram, Google, Microsoft, OpenAI, Anthropic, Gemini | je nachdem, welche Provider genutzt werden | | Optional | Ollama auf Host oder im Netz | nur bei Nutzung lokaler KI | | Port | 47840 (Standard) | frei wählbar in .env |
Hinweis zu lokaler KI (Ollama): Loqari kommuniziert per HTTP mit einer existierenden Ollama-Instanz. Ollama wird nicht im Container mitgeliefert – Standard ist host.docker.internal:11434 (Host-Ollama).
---
# 1. Beliebiges Verzeichnis wählen, z.B. /opt/loqari oder ~/docker/loqari
mkdir -p ~/docker/loqari && cd ~/docker/loqari

# 2. ZIP entpacken (oder Repo clonen)
unzip /pfad/zu/loqari_release.zip

# 3. Starten
chmod +x manage.sh
./manage.sh up
Beim ersten Start erzeugt manage.sh automatisch eine .env mit erkannten Werten (UID, GID, Zeitzone) und baut das Image.
Web-UI: http://<host>:47840/ Login: admin / admin → sofort in der UI ändern.
---
Debian / Ubuntu:
curl -fsSL https://get.docker.com | sudo sh
sudo usermod -aG docker $USER
newgrp docker
Fedora / RHEL / CentOS Stream:
sudo dnf install -y dnf-plugins-core
sudo dnf config-manager --add-repo https://download.docker.com/linux/fedora/docker-ce.repo
sudo dnf install -y docker-ce docker-ce-cli containerd.io docker-buildx-plugin docker-compose-plugin
sudo systemctl enable --now docker
sudo usermod -aG docker $USER
newgrp docker
Arch / Manjaro:
sudo pacman -S docker docker-compose
sudo systemctl enable --now docker
sudo usermod -aG docker $USER
newgrp docker
Test:
docker version
docker compose version
sudo mkdir -p /opt/loqari
sudo chown $USER:$USER /opt/loqari
cd /opt/loqari
unzip /pfad/zu/loqari_release.zip
chmod +x manage.sh entrypoint.sh
./manage.sh up
manage.sh erkennt automatisch:
id -uid -g/etc/timezone oder /etc/localtimeund legt sie in .env ab.
docker compose mit restart: unless-stopped startet bereits automatisch nach Reboot. Ein zusätzlicher systemd-Service wird nicht benötigt. Falls explizit gewünscht:
sudo tee /etc/systemd/system/loqari.service > /dev/null << 'EOF'
[Unit]
Description=Loqari Docker Compose
Requires=docker.service
After=docker.service network-online.target

[Service]
Type=oneshot
RemainAfterExit=yes
WorkingDirectory=/opt/loqari
ExecStart=/usr/bin/docker compose up -d
ExecStop=/usr/bin/docker compose down

[Install]
WantedBy=multi-user.target
EOF

sudo systemctl daemon-reload
sudo systemctl enable --now loqari
---
Im Terminal:
mkdir -p ~/docker/loqari && cd ~/docker/loqari
unzip ~/Downloads/loqari_release.zip
chmod +x manage.sh entrypoint.sh
./manage.sh up
Bekannte macOS-Spezifika:
host.docker.internal funktioniert nativ (für Ollama-Anbindung an Host).manage.sh setzt automatisch korrekte UID/GID in .env.---
wsl --install
Reboot, danach Ubuntu (oder eine andere Distro) aus dem Microsoft Store installieren.
Wir empfehlen, Loqari innerhalb der WSL2-Distro zu installieren, nicht direkt unter Windows. Das erspart Probleme mit Dateirechten und Line-Endings.
In Ubuntu (WSL):
mkdir -p ~/docker/loqari && cd ~/docker/loqari
# ZIP nach WSL kopieren, z.B. via Explorer-Pfad \\wsl$\Ubuntu\home\<user>\docker\loqari\
unzip loqari_release.zip
chmod +x manage.sh entrypoint.sh
./manage.sh up
Web-UI: vom Windows-Host aus erreichbar unter http://localhost:47840/.
Falls erforderlich, geht es auch in PowerShell, aber mit Einschränkungen (Zeilenenden, fehlendes id, fehlendes chmod):
cd C:\loqari
# .env manuell anlegen mit:
#   TZ=Europe/Berlin
#   PUID=1000
#   PGID=1000
#   PORT=47840
docker compose up -d --build
---
Container Manager ist auf DSM 7.2+ verfügbar (vorher „Docker"-Paket). Funktional identisch.
/docker/loqari.ssh admin@<nas-ip>
cd /volume1/docker/loqari # oder dein gewählter Pfad
chmod +x manage.sh entrypoint.sh
sudo ./manage.sh up
/docker/loqari setzen..env manuell anlegen mit:TZ=Europe/Berlin
PUID=1026
PGID=100
PORT=47840
Synology nutzt Standard-UID1026für Admin und GID100(Gruppeusers). Mitid <user>per SSH genau ermitteln.
Systemsteuerung → Anmeldeportal → Erweitert → Reverse Proxy → Erstellen:
| Feld | Wert | | ---- | ---- | | Beschreibung | Loqari | | Quelle | HTTPS, loqari.deine-domain.tld, Port 443 | | Ziel | HTTP, localhost, Port 47840 | | Custom Header → WebSocket | „Erstellen" → WebSocket aktivieren |
Anschließend in der Loqari-UI „Allgemein → Public Base URL" auf https://loqari.deine-domain.tld setzen.
---
/volume3/docker/loqari (Pfad je nach Volume-Layout).ssh fabian@<nas-ip>
cd /volume3/docker/loqari
unzip loqari_release.zip
chmod +x manage.sh entrypoint.sh
./manage.sh up
manage.sh erkennt deine UID/GID automatisch (auf UGREEN typisch uid=1000 (fabian), gid=10 (admin)).
Falls bevorzugt, kannst du das Projekt auch über die UI als Compose-Stack importieren:
.env daneben legen mit TZ, PUID, PGID, PORT.http://<nas-ip>:47840/---
/share/Container/loqari.ssh admin@<nas-ip>
cd /share/Container/loqari
unzip loqari_release.zip
chmod +x manage.sh entrypoint.sh
./manage.sh up
QNAP-Hinweis: UID/GID des Container-Station-Users ist meist admin/administrators (UID 0 / GID 0). manage.sh setzt entsprechend PUID=0, was funktioniert, aber Daten gehören dann root. Für saubere Trennung einen eigenen User mit fester UID/GID anlegen.
Alternativ: in Container Station → Anwendungen → Erstellen → Compose-Datei einfügen.
---
docker-compose.yml einfügen./boot/config/plugins/compose.manager/projects/loqari/) .env anlegen:TZ=Europe/Berlin
PUID=99
PGID=100
PORT=47840
Unraid Standard-User: UID 99 (nobody), GID 100 (users).
Der Volume-Mount ./data:/data zeigt standardmäßig auf /boot/config/plugins/compose.manager/projects/loqari/data. Empfehlung: stattdessen in der Compose-Datei explizit auf einen Array-Pfad mappen, z.B. /mnt/user/appdata/loqari:/data, damit das boot-Filesystem klein bleibt:
volumes:
  - /mnt/user/appdata/loqari:/data
---
TrueNAS Scale (≥ 24.10 „Electric Eel") nutzt nativ Docker. Einfachster Weg über die App-Verwaltung als „Custom App":
docker-compose.yml-Inhalt einfügen.data auf einen Dataset-Pfad mappen, z.B. /mnt/tank/apps/loqari/data.TZ, PUID, PGID, PORT direkt setzen.Alternativ klassisch per SSH wie unter Linux.
---
Für produktive K8s-Deployments wird kein offizielles Helm-Chart mitgeliefert. Loqari ist ein einzelner stateful Container, ein einfaches Manifest reicht:
apiVersion: apps/v1
kind: Deployment
metadata:
  name: loqari
spec:
  replicas: 1
  strategy:
    type: Recreate
  selector:
    matchLabels:
      app: loqari
  template:
    metadata:
      labels:
        app: loqari
    spec:
      containers:
      - name: loqari
        image: loqari:latest
        imagePullPolicy: IfNotPresent
        env:
        - name: TZ
          value: "Europe/Berlin"
        - name: PUID
          value: "1000"
        - name: PGID
          value: "1000"
        - name: DATA_DIR
          value: "/data"
        ports:
        - containerPort: 8000
        volumeMounts:
        - name: data
          mountPath: /data
        livenessProbe:
          httpGet:
            path: /health
            port: 8000
          initialDelaySeconds: 30
          periodSeconds: 30
      volumes:
      - name: data
        persistentVolumeClaim:
          claimName: loqari-data
---
apiVersion: v1
kind: Service
metadata:
  name: loqari
spec:
  selector:
    app: loqari
  ports:
  - port: 80
    targetPort: 8000
---
apiVersion: v1
kind: PersistentVolumeClaim
metadata:
  name: loqari-data
spec:
  accessModes: [ReadWriteOnce]
  resources:
    requests:
      storage: 1Gi
Wichtig:
docker build -t loqari:latest .) und in eine Registry pushen.replicas: 1 erzwingen – Loqari ist nicht für horizontale Skalierung ausgelegt (lokaler State, einzelner Telegram-Bot pro User, einzelner Scheduler).---
Loqari verlangt keinen internen TLS-Endpoint, läuft aber dennoch problemlos hinter einem Reverse Proxy (NPM, Traefik, Caddy, nginx, HAProxy). Für OAuth (Google/Microsoft) ist eine extern erreichbare HTTPS-URL erforderlich.
| Feld | Wert | | ---- | ---- | | Domain Names | loqari.example.com | | Scheme | http | | Forward Hostname / IP | <docker-host-ip> oder Container-Name (wenn NPM im selben Docker-Netz) | | Forward Port | 47840 | | Cache Assets | aus | | Block Common Exploits | aus | | Websockets Support | an |
https://loqari.example.com.Falls Loqari im selben Compose-Stack mit Traefik läuft:
services:
  loqari:
    # ... bestehende Definition ...
    labels:
      - traefik.enable=true
      - traefik.http.routers.loqari.rule=Host(`loqari.example.com`)
      - traefik.http.routers.loqari.entrypoints=websecure
      - traefik.http.routers.loqari.tls.certresolver=letsencrypt
      - traefik.http.services.loqari.loadbalancer.server.port=8000
Caddyfile:
loqari.example.com {
    reverse_proxy localhost:47840
}
Caddy unterstützt WebSockets automatisch und holt Let's-Encrypt-Zertifikate selbst.
server {
    listen 443 ssl http2;
    server_name loqari.example.com;

    ssl_certificate     /etc/letsencrypt/live/loqari.example.com/fullchain.pem;
    ssl_certificate_key /etc/letsencrypt/live/loqari.example.com/privkey.pem;

    location / {
        proxy_pass http://127.0.0.1:47840;
        proxy_http_version 1.1;
        proxy_set_header Upgrade $http_upgrade;
        proxy_set_header Connection "upgrade";
        proxy_set_header Host $host;
        proxy_set_header X-Forwarded-Proto $scheme;
        proxy_set_header X-Forwarded-Host  $host;
        proxy_set_header X-Forwarded-For   $proxy_add_x_forwarded_for;
    }
}
Loqari erkennt eingehende X-Forwarded-Proto / X-Forwarded-Host automatisch und setzt beim ersten Zugriff die public_base_url selbst, falls noch der Default http://localhost:47840 aktiv ist.
Wenn die UI bereits eine andere public_base_url hat oder du sie manuell überschreiben möchtest:
UI → Einstellungen → Allgemein → Public Base URL = z.B. https://loqari.example.com → Speichern.
Diese URL wird für die OAuth-Redirects (Google, Microsoft) verwendet – sie muss mit den dort eingetragenen Redirect-URIs übereinstimmen, sonst schlägt der OAuth-Flow fehl.
---
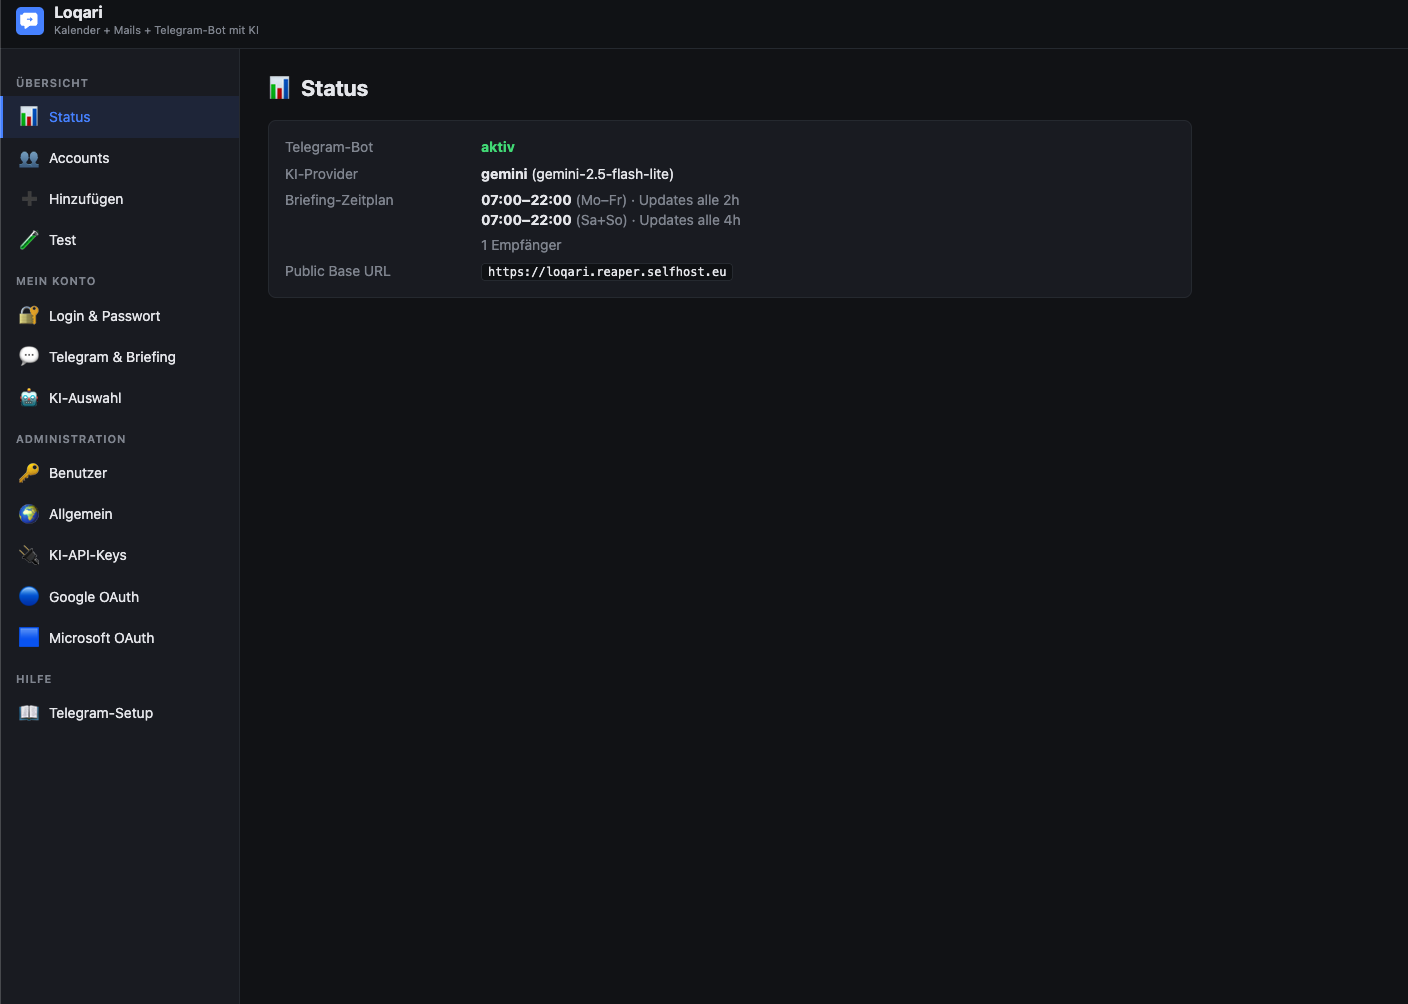
Reihenfolge, sobald die UI unter http://<host>:47840/ erreichbar ist.
admin / admin.Einstellungen → Allgemein. Wenn du hinter einem Reverse Proxy bist und die externe URL korrekt ist, wird sie meist automatisch erkannt (X-Forwarded-* Header). Andernfalls manuell setzen.
/newbot → Name + Username vergeben → HTTP-API-Token kopieren./start schicken, dann /id → die zurückgegebene User-ID kopieren.Bot startet automatisch neu, sobald der Token in der UI geändert wird.
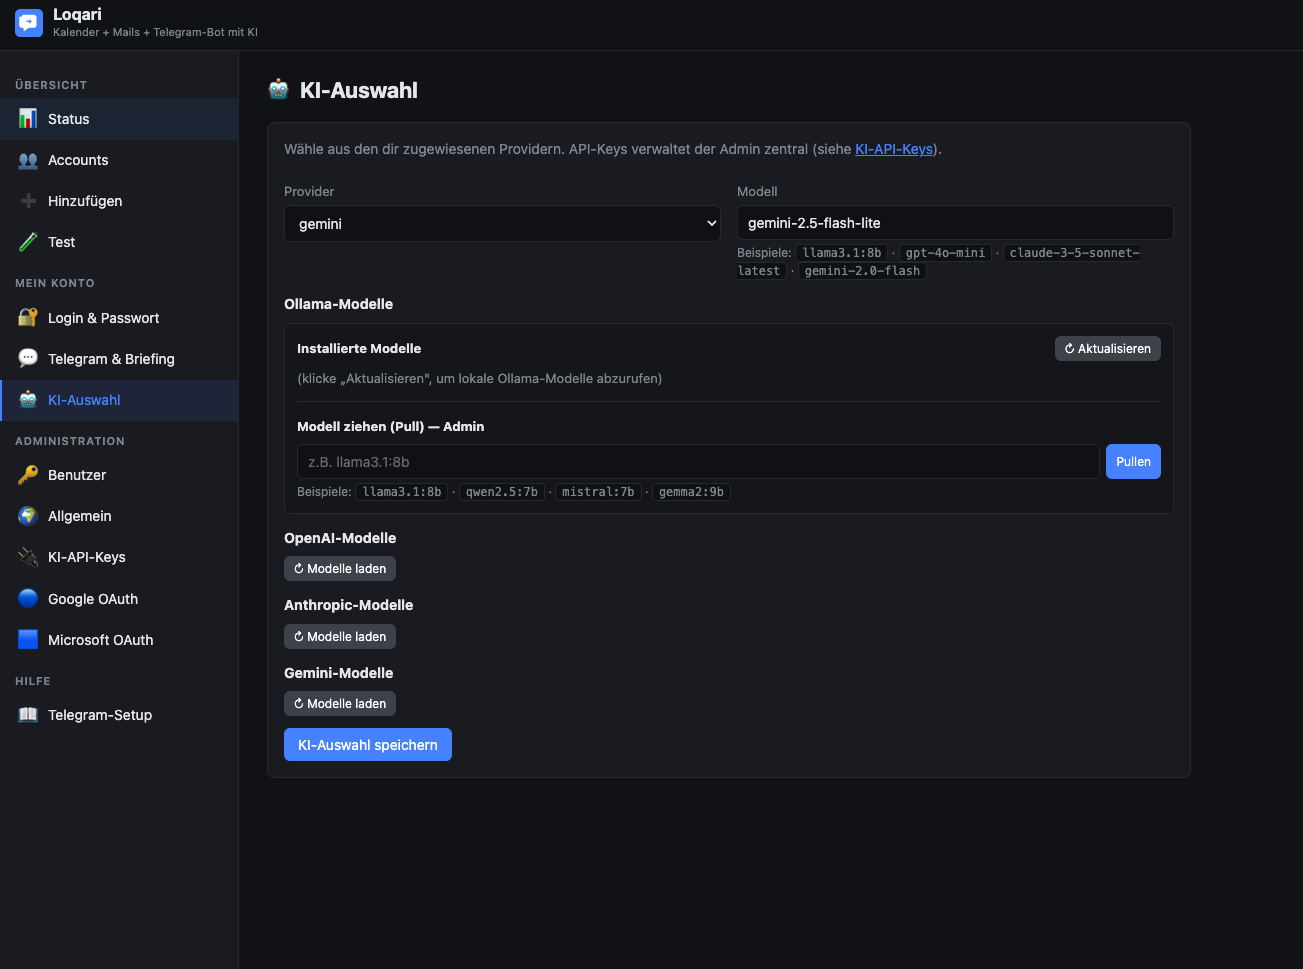
Einstellungen → KI-Auswahl → Provider wählen:
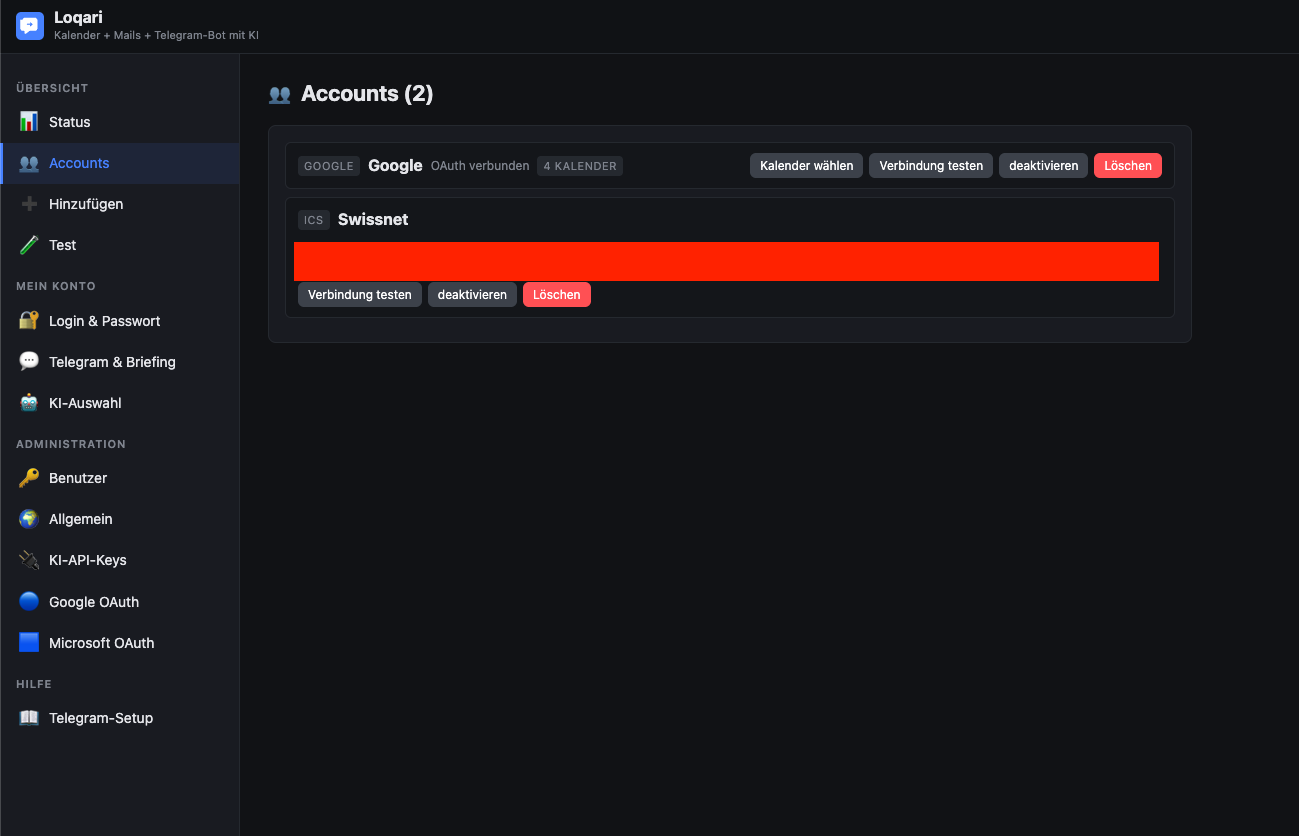
llama3.1:8b).Einstellungen → Hinzufügen. Optionen:
Nach dem Anlegen unter „Test" überprüfen, ob die Verbindung funktioniert.
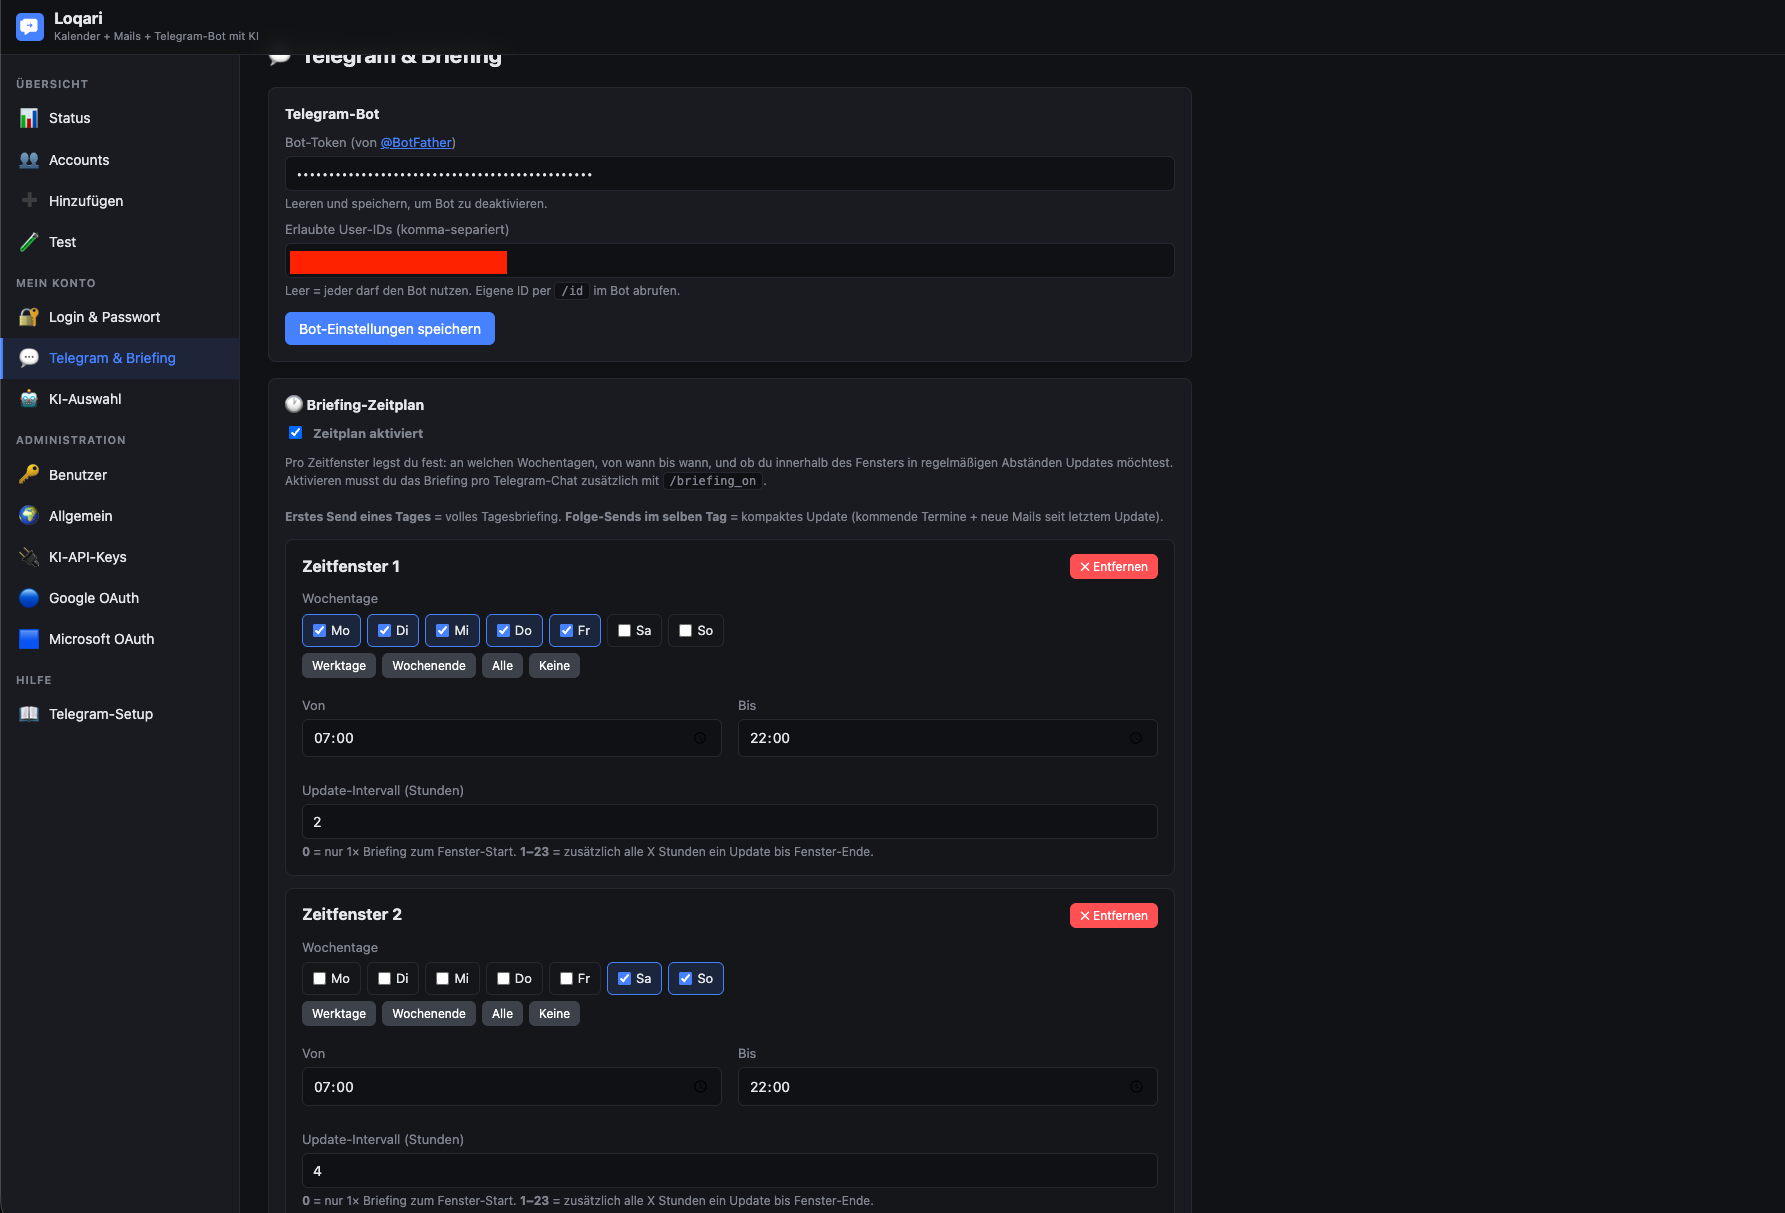
/briefing_on senden.---
cd /pfad/zu/loqari

# 1. Backup machen
tar -czf ~/loqari-backup-$(date +%F).tgz data/

# 2. Container stoppen
./manage.sh down

# 3. Neue Version entpacken (überschreibt Code, NICHT data/)
unzip -o /pfad/zu/loqari_release_neu.zip

# 4. Image neu bauen + starten
./manage.sh rebuild
manage.sh rebuild führt ein docker compose down --rmi all && docker compose up -d --build aus. Dadurch wird das Image komplett neu gebaut.
Migrationen der config.json laufen automatisch beim Start (Single-User → Multi-User, Legacy-Briefing-Felder → Window-Schema).
---
Alle persistenten Daten liegen in ./data/:
| Datei | Inhalt | | ----- | ------ | | config.json | Globale Einstellungen, alle User, Telegram-Tokens, KI-API-Keys, OAuth-Apps, Secret Key | | accounts.json | Hinterlegte Kalender-/Mail-Accounts inkl. OAuth-Refresh-Tokens, IMAP-/CalDAV-Passwörtern | | briefing_chats.json | Pro User die Telegram-Chats mit aktiviertem Briefing | | state.json | Briefing-Sende-Status (welcher Chat hat heute schon ein Briefing erhalten) |
config.json und accounts.json enthalten alle Geheimnisse im Klartext. Backup entsprechend verschlüsselt ablegen.
tar -czf loqari-backup-$(date +%F).tgz -C /pfad/zu/loqari data/
cd /pfad/zu/loqari
./manage.sh down
rm -rf data/
tar -xzf loqari-backup-2025-12-01.tgz
./manage.sh up
crontab -e
# tägliches Backup um 03:00, 14 Tage Aufbewahrung
0 3 * * * tar -czf /backup/loqari-$(date +\%F).tgz -C /opt/loqari data/ && find /backup -name 'loqari-*.tgz' -mtime +14 -delete
---
cd /pfad/zu/loqari
./manage.sh down
docker rmi loqari:latest
cd ..
rm -rf loqari/         # entfernt auch ./data ! Vorher Backup!
Oder nur Container weg, Daten behalten:
./manage.sh down
docker rmi loqari:latest
---
/dataPUID/PGID in .env stimmen nicht mit dem Owner des data/-Verzeichnisses überein. Lösung:
sudo chown -R $(id -u):$(id -g) data/
./manage.sh restart
oder die Werte in .env anpassen.
./manage.sh logs → Zeile „Bot gestartet für User=…"./id in Telegram aufrufen → mit Eintrag in der UI vergleichen.Conflict: terminated by other getUpdates request oder Unauthorized./briefing_on ausgeführt?TZ in .env) korrekt? Sonst sendet er gefühlt zu falscher Uhrzeit.https://<deine-url>/oauth/google/callback bzw. /oauth/microsoft/callback?refresh_token zurück → App-Berechtigung im Google-Konto manuell widerrufen (myaccount.google.com → Sicherheit → Drittanbieter-Apps) und erneut autorisieren. Loqari fordert beim Re-Consent automatisch einen neuen refresh_token an.common (private + Org-Konten), consumers (nur privat) oder konkrete Tenant-ID (nur eine Org)?Ollama Base URL prüfen. Default: http://host.docker.internal:11434.http://ollama:11434.curl http://host.docker.internal:11434/api/tags aus dem Loqari-Container heraus (docker exec -it loqari sh -c 'apt-get update && apt-get install -y curl && curl …').Auf Linux ist host.docker.internal nicht out-of-the-box vorhanden. In docker-compose.yml ist deshalb gesetzt:
extra_hosts:
  - "host.docker.internal:host-gateway"
Das funktioniert mit Docker ≥ 20.10. Falls nicht: stattdessen die LAN-IP des Hosts eintragen (z.B. http://192.168.1.10:11434).
unhealthy / Restart-Loop)./manage.sh logsss -tlnp | grep 47840df -hdata/ schreibbar? Permissions wie unter 17.1.Banner zeigt sich nur, solange ein Admin-User die Kombi admin / admin hat. Sobald ein Admin geänderte Credentials hat, verschwindet der Banner. Bei mehreren Admins muss jeder Admin geändert sein.
Compose-Cache:
./manage.sh down
docker compose build --no-cache
docker compose up -d
.env: TZ=Europe/Berlin (oder passend) setzen.manage.sh restart reicht. Bei Wechsel der TZ wird der Scheduler automatisch mit der neuen TZ instanziiert.---
| Pfad (Host) | Inhalt | | ----------- | ------ | | ./.env | Plattform-Werte (TZ, PUID, PGID, PORT) | | ./docker-compose.yml | Compose-Definition | | ./Dockerfile | Image-Bauanweisungen | | ./entrypoint.sh | Container-Entrypoint, übernimmt UID/GID-Drop | | ./manage.sh | Helfer-Skript (up | down | rebuild | restart | logs | status) | | ./app/ | Python-Code | | ./data/ | persistente Daten (volume-gemountet auf /data im Container) |
| Pfad (Container) | Inhalt | | ---------------- | ------ | | /app/ | App-Code | | /data/ | Volume-Mount aus ./data | | /entrypoint.sh | Entrypoint |
---
| Port | Funktion | | ---- | -------- | | 8000 (im Container) | Uvicorn / FastAPI Web-UI | | 47840 (Host, Default) | Mapping aus ${PORT} in .env | | 11434 (auf Host, optional) | Ollama API |
---
Fertig. Bei Problemen: erst ./manage.sh logs lesen, dann diese Anleitung nach Stichwort durchsuchen, dann ggf. Issue eröffnen.
Self-hosted Docker container that connects calendar + email with a Telegram bot and AI.
This guide describes installation and initial setup on all common platforms: Linux, macOS, Windows (Docker Desktop / WSL2), Synology DSM, UGREEN NAS, QNAP, Unraid, TrueNAS Scale, and Kubernetes.
---
---
| Component | Minimum Version | Note | | --------- | --------------- | ---- | | Docker Engine | 24.x | with Compose plugin (docker compose, not docker-compose) | | RAM | 256 MB free | app container itself is very lightweight | | Disk | ~300 MB | image + data | | CPU | any (x86_64 or ARM64) | | | Network | outbound to Telegram, Google, Microsoft, OpenAI, Anthropic, Gemini | depending on which providers you use | | Optional | Ollama on host or in network | only when using local AI | | Port | 47840 (default) | freely selectable in .env |
Note on local AI (Ollama): Loqari communicates via HTTP with an existing Ollama instance. Ollama is not included in the container – default is host.docker.internal:11434 (host Ollama).
---
# 1. Choose any directory, e.g. /opt/loqari or ~/docker/loqari
mkdir -p ~/docker/loqari && cd ~/docker/loqari

# 2. Extract ZIP (or clone repo)
unzip /path/to/loqari_release.zip

# 3. Start
chmod +x manage.sh
./manage.sh up
On first start, manage.sh automatically creates a .env with detected values (UID, GID, timezone) and builds the image.
Web UI: http://<host>:47840/ Login: admin / admin → change immediately in the UI.
---
Debian / Ubuntu:
curl -fsSL https://get.docker.com | sudo sh
sudo usermod -aG docker $USER
newgrp docker
Fedora / RHEL / CentOS Stream:
sudo dnf install -y dnf-plugins-core
sudo dnf config-manager --add-repo https://download.docker.com/linux/fedora/docker-ce.repo
sudo dnf install -y docker-ce docker-ce-cli containerd.io docker-buildx-plugin docker-compose-plugin
sudo systemctl enable --now docker
sudo usermod -aG docker $USER
newgrp docker
Arch / Manjaro:
sudo pacman -S docker docker-compose
sudo systemctl enable --now docker
sudo usermod -aG docker $USER
newgrp docker
Test:
docker version
docker compose version
sudo mkdir -p /opt/loqari
sudo chown $USER:$USER /opt/loqari
cd /opt/loqari
unzip /path/to/loqari_release.zip
chmod +x manage.sh entrypoint.sh
./manage.sh up
manage.sh automatically detects:
id -uid -g/etc/timezone or /etc/localtimeand places them in .env.
docker compose with restart: unless-stopped already automatically restarts after reboot. An additional systemd service is not required. If explicitly desired:
sudo tee /etc/systemd/system/loqari.service > /dev/null << 'EOF'
[Unit]
Description=Loqari Docker Compose
Requires=docker.service
After=docker.service network-online.target

[Service]
Type=oneshot
RemainAfterExit=yes
WorkingDirectory=/opt/loqari
ExecStart=/usr/bin/docker compose up -d
ExecStop=/usr/bin/docker compose down

[Install]
WantedBy=multi-user.target
EOF

sudo systemctl daemon-reload
sudo systemctl enable --now loqari
---
In terminal:
mkdir -p ~/docker/loqari && cd ~/docker/loqari
unzip ~/Downloads/loqari_release.zip
chmod +x manage.sh entrypoint.sh
./manage.sh up
Known macOS specifics:
host.docker.internal works natively (for Ollama binding to host).manage.sh automatically sets correct UID/GID in .env.---
wsl --install
Reboot, then install Ubuntu (or another distro) from Microsoft Store.
We recommend installing Loqari within the WSL2 distro, not directly under Windows. This avoids file permission and line-ending issues.
In Ubuntu (WSL):
mkdir -p ~/docker/loqari && cd ~/docker/loqari
# Copy ZIP to WSL, e.g., via Explorer path \\wsl$\Ubuntu\home\<user>\docker\loqari\
unzip loqari_release.zip
chmod +x manage.sh entrypoint.sh
./manage.sh up
Web UI: accessible from Windows host at http://localhost:47840/.
If required, it also works in PowerShell, but with limitations (line endings, missing id, missing chmod):
cd C:\loqari
# Create .env manually with:
#   TZ=Europe/Berlin
#   PUID=1000
#   PGID=1000
#   PORT=47840
docker compose up -d --build
---
Container Manager is available on DSM 7.2+ (previously "Docker" package). Functionally identical.
/docker/loqari.ssh admin@<nas-ip>
cd /volume1/docker/loqari # or your chosen path
chmod +x manage.sh entrypoint.sh
sudo ./manage.sh up
/docker/loqari..env manually with:TZ=Europe/Berlin
PUID=1026
PGID=100
PORT=47840
Synology uses standard UID1026for admin and GID100(groupusers). Determine exactly withid <user>via SSH.
Control Panel → Login Portal → Advanced → Reverse Proxy → Create:
| Field | Value | | ----- | ----- | | Description | Loqari | | Source | HTTPS, loqari.your-domain.tld, Port 443 | | Destination | HTTP, localhost, Port 47840 | | Custom Header → WebSocket | "Create" → enable WebSocket |
Then in Loqari UI, set "General → Public Base URL" to https://loqari.your-domain.tld.
---
/volume3/docker/loqari (path depends on volume layout).ssh fabian@<nas-ip>
cd /volume3/docker/loqari
unzip loqari_release.zip
chmod +x manage.sh entrypoint.sh
./manage.sh up
manage.sh automatically detects your UID/GID (on UGREEN typically uid=1000 (fabian), gid=10 (admin)).
If preferred, you can also import the project via UI as a Compose stack:
.env alongside it with TZ, PUID, PGID, PORT.http://<nas-ip>:47840/---
/share/Container/loqari.ssh admin@<nas-ip>
cd /share/Container/loqari
unzip loqari_release.zip
chmod +x manage.sh entrypoint.sh
./manage.sh up
QNAP Note: UID/GID of Container Station user is usually admin/administrators (UID 0 / GID 0). manage.sh sets PUID=0 accordingly, which works, but then data is owned by root. For clean separation, create a separate user with fixed UID/GID.
Alternatively: in Container Station → Applications → Create → paste Compose file.
---
docker-compose.yml./boot/config/plugins/compose.manager/projects/loqari/) create .env:TZ=Europe/Berlin
PUID=99
PGID=100
PORT=47840
Unraid standard user: UID 99 (nobody), GID 100 (users).
The volume mount ./data:/data points by default to /boot/config/plugins/compose.manager/projects/loqari/data. Recommendation: instead, map explicitly to an array path in Compose, e.g. /mnt/user/appdata/loqari:/data, to keep the boot filesystem small:
volumes:
  - /mnt/user/appdata/loqari:/data
---
TrueNAS Scale (≥ 24.10 "Electric Eel") natively supports Docker. Easiest via app management as "Custom App":
docker-compose.yml content.data to a dataset path, e.g. /mnt/tank/apps/loqari/data.TZ, PUID, PGID, PORT directly.Alternatively, classically via SSH like under Linux.
---
For productive K8s deployments, no official Helm chart is provided. Loqari is a single stateful container; a simple manifest suffices:
apiVersion: apps/v1
kind: Deployment
metadata:
  name: loqari
spec:
  replicas: 1
  strategy:
    type: Recreate
  selector:
    matchLabels:
      app: loqari
  template:
    metadata:
      labels:
        app: loqari
    spec:
      containers:
      - name: loqari
        image: loqari:latest
        imagePullPolicy: IfNotPresent
        env:
        - name: TZ
          value: "Europe/Berlin"
        - name: PUID
          value: "1000"
        - name: PGID
          value: "1000"
        - name: DATA_DIR
          value: "/data"
        ports:
        - containerPort: 8000
        volumeMounts:
        - name: data
          mountPath: /data
        livenessProbe:
          httpGet:
            path: /health
            port: 8000
          initialDelaySeconds: 30
          periodSeconds: 30
      volumes:
      - name: data
        persistentVolumeClaim:
          claimName: loqari-data
---
apiVersion: v1
kind: Service
metadata:
  name: loqari
spec:
  selector:
    app: loqari
  ports:
  - port: 80
    targetPort: 8000
---
apiVersion: v1
kind: PersistentVolumeClaim
metadata:
  name: loqari-data
spec:
  accessModes: [ReadWriteOnce]
  resources:
    requests:
      storage: 1Gi
Important:
docker build -t loqari:latest .) and push to a registry.replicas: 1 – Loqari is not designed for horizontal scaling (local state, single Telegram bot per user, single scheduler).---
Loqari does not require an internal TLS endpoint, but works seamlessly behind a reverse proxy (NPM, Traefik, Caddy, nginx, HAProxy). For OAuth (Google/Microsoft), an externally reachable HTTPS URL is required.
| Field | Value | | ----- | ----- | | Domain Names | loqari.example.com | | Scheme | http | | Forward Hostname / IP | <docker-host-ip> or container name (if NPM in same Docker network) | | Forward Port | 47840 | | Cache Assets | off | | Block Common Exploits | off | | Websockets Support | on |
https://loqari.example.com.If Loqari is in the same Compose stack with Traefik:
services:
  loqari:
    # ... existing definition ...
    labels:
      - traefik.enable=true
      - traefik.http.routers.loqari.rule=Host(`loqari.example.com`)
      - traefik.http.routers.loqari.entrypoints=websecure
      - traefik.http.routers.loqari.tls.certresolver=letsencrypt
      - traefik.http.services.loqari.loadbalancer.server.port=8000
Caddyfile:
loqari.example.com {
    reverse_proxy localhost:47840
}
Caddy supports WebSockets automatically and obtains Let's Encrypt certificates itself.
server {
    listen 443 ssl http2;
    server_name loqari.example.com;

    ssl_certificate     /etc/letsencrypt/live/loqari.example.com/fullchain.pem;
    ssl_certificate_key /etc/letsencrypt/live/loqari.example.com/privkey.pem;

    location / {
        proxy_pass http://127.0.0.1:47840;
        proxy_http_version 1.1;
        proxy_set_header Upgrade $http_upgrade;
        proxy_set_header Connection "upgrade";
        proxy_set_header Host $host;
        proxy_set_header X-Forwarded-Proto $scheme;
        proxy_set_header X-Forwarded-Host  $host;
        proxy_set_header X-Forwarded-For   $proxy_add_x_forwarded_for;
    }
}
Loqari automatically recognizes incoming X-Forwarded-Proto / X-Forwarded-Host and on first access sets the public_base_url itself if the default http://localhost:47840 is still active.
If the UI already has a different public_base_url or you want to override it manually:
UI → Settings → General → Public Base URL = e.g. https://loqari.example.com → Save.
This URL is used for OAuth redirects (Google, Microsoft) – it must match the redirect URIs registered there, otherwise the OAuth flow fails.
---
Sequence once the UI is accessible at http://<host>:47840/.
admin / admin.Settings → General. If you are behind a reverse proxy and the external URL is correct, it is usually detected automatically (X-Forwarded-* headers). Otherwise, set manually.
/newbot → enter name + username → copy HTTP API token./start, then /id → copy the returned user ID.Bot automatically restarts once token is changed in UI.
Settings → AI Selection → choose provider:
llama3.1:8b).Settings → Add. Options:
After creating, check under "Test" whether connection works.
/briefing_on.---
cd /path/to/loqari

# 1. Make backup
tar -czf ~/loqari-backup-$(date +%F).tgz data/

# 2. Stop container
./manage.sh down

# 3. Extract new version (overwrites code, NOT data/)
unzip -o /path/to/loqari_release_new.zip

# 4. Rebuild image + start
./manage.sh rebuild
manage.sh rebuild runs docker compose down --rmi all && docker compose up -d --build. This completely rebuilds the image.
Migrations of config.json run automatically on start (single-user → multi-user, legacy briefing fields → window schema).
---
All persistent data resides in ./data/:
| File | Content | | ---- | ------- | | config.json | Global settings, all users, Telegram tokens, AI API keys, OAuth apps, secret key | | accounts.json | Stored calendar/email accounts incl. OAuth refresh tokens, IMAP/CalDAV passwords | | briefing_chats.json | Per user, Telegram chats with briefing enabled | | state.json | Briefing send status (which chat has already received briefing today) |
config.json and accounts.json contain all secrets in plaintext. Store backups encrypted accordingly.
tar -czf loqari-backup-$(date +%F).tgz -C /path/to/loqari data/
cd /path/to/loqari
./manage.sh down
rm -rf data/
tar -xzf loqari-backup-2025-12-01.tgz
./manage.sh up
crontab -e
# daily backup at 03:00, keep 14 days
0 3 * * * tar -czf /backup/loqari-$(date +\%F).tgz -C /opt/loqari data/ && find /backup -name 'loqari-*.tgz' -mtime +14 -delete
---
cd /path/to/loqari
./manage.sh down
docker rmi loqari:latest
cd ..
rm -rf loqari/         # removes ./data too! Backup first!
Or container only, keep data:
./manage.sh down
docker rmi loqari:latest
---
/dataPUID/PGID in .env don't match the owner of the data/ directory. Solution:
sudo chown -R $(id -u):$(id -g) data/
./manage.sh restart
or adjust values in .env.
./manage.sh logs → line "Bot started for User=…"./id in Telegram → compare with UI entry.Conflict: terminated by other getUpdates request or Unauthorized./briefing_on in target chat?TZ in .env) correct? Otherwise sends at wrong time.https://<your-url>/oauth/google/callback or /oauth/microsoft/callback?refresh_token returned → manually revoke app permission in Google account (myaccount.google.com → Security → Third-party apps) and authorize again. Loqari automatically requests new refresh_token on re-consent.common (private + org accounts), consumers (private only) or specific tenant ID (one org only)?Ollama Base URL check. Default: http://host.docker.internal:11434.http://ollama:11434.curl http://host.docker.internal:11434/api/tags from Loqari container (docker exec -it loqari sh -c 'apt-get update && apt-get install -y curl && curl …').On Linux, host.docker.internal is not available out-of-the-box. Therefore in docker-compose.yml is set:
extra_hosts:
  - "host.docker.internal:host-gateway"
This works with Docker ≥ 20.10. If not: instead enter the LAN IP of the host (e.g. http://192.168.1.10:11434).
unhealthy / restart loop)./manage.sh logsss -tlnp | grep 47840df -hdata/ writable? Permissions as under 17.1.Banner shows only while an admin user has combo admin / admin. Once any admin has changed credentials, banner disappears. If multiple admins, all must be changed.
Compose cache:
./manage.sh down
docker compose build --no-cache
docker compose up -d
.env: set TZ=Europe/Berlin (or as appropriate).manage.sh restart is enough. Scheduler auto-instantiates with new TZ on switch.---
| Path (Host) | Content | | ----------- | ------- | | ./.env | Platform values (TZ, PUID, PGID, PORT) | | ./docker-compose.yml | Compose definition | | ./Dockerfile | Image build instructions | | ./entrypoint.sh | Container entrypoint, performs UID/GID drop | | ./manage.sh | Helper script (up | down | rebuild | restart | logs | status) | | ./app/ | Python code | | ./data/ | Persistent data (volume-mounted to /data in container) |
| Path (Container) | Content | | ---------------- | ------- | | /app/ | App code | | /data/ | Volume mount from ./data | | /entrypoint.sh | Entrypoint |
---
| Port | Function | | ---- | -------- | | 8000 (in container) | Uvicorn / FastAPI web UI | | 47840 (host, default) | Mapping from ${PORT} in .env | | 11434 (on host, optional) | Ollama API |
---
Done. If problems: first read ./manage.sh logs, then search this guide by keyword, then if needed open an issue.
Preise